How To Create Feature Branch In Git or Bitbucket
How To Create Feature Branch In Git or Bit bucket
Feature Branch:
Feature branch is nothing but a normal git or bit bucket branch under your master or parent branch. Here Iam going to create a feature branch called “feature/E-1134”. Here feature/E-1134 is a just branch name. Don’t think that under feature we are going to create E-1134. Just my branch name is “feature/E-1134”. in the following steps i will show clearly how to create feature branch in git and bit bucket.
Here E-1134 is a task id(user story or backlog item assigned to me in my organisation). Those who are working in any organisations they will assigned with different tasks with task id. So that’s why here iam using E-1134.
So by adding Feature word in my branch name we can easily find our branch in git hub or bit bucket. or if you think it is too much difficult to understand then you can give any normal name like “antony”. In the following example I will create two feature branches one is “feature/E-1134” and another one “antony”
To create feature branches in remote git hub or bit bucket we have to follow 3 steps those are
- creating feature branches in local repository
- checkout into feature branch
- push feature branch into remote github or bitbucket
After cloning your repository you can see your cloned repository. you can check with ls command. Here in my case it is decodingdevops.
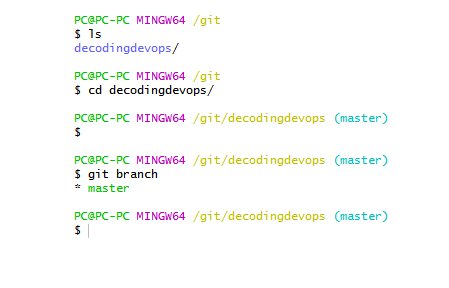
Enter into your repository
cd <repository name>
cd decodingdevops
After entering your repository you can see you are in master branch. or you can check by using git branch command
git branch
Here it is showing only a master branch
Creating Feature Branches In Local Repository-How To Create Feature Branch
Now create a new feature branch by using git branch command
git branch feature/E-1134
So I created a feature branch name called “feature/E-1134”. Now you can check your branches with git branch command.
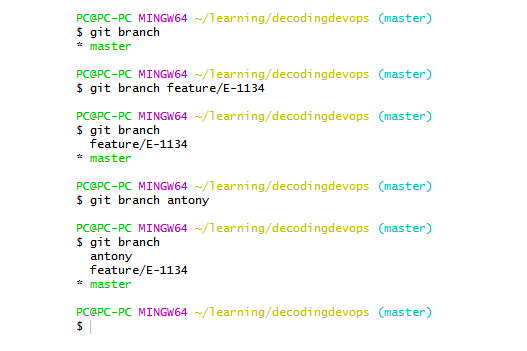
You can see master and newly created branch “feature/E-1134”.Now I will create another feature branch name called “antony”.
git branch antony
You can again check with git branch command it will show you three branches one is master remaining are “feature/E-1134”,”antony”.
So we have successfully created two feature branches called “feature/E-1134”,”antony” in local repository.
Checkout Into Feature Branch-How To Create Feature Branch
When ever you want to push your changes or newly created branches to remote repository or git-hub or bit-bucket, you must be in that branch only. then only you can push otherwise it will through you error.
So enter into your feature branch by using checkout command. checkout command is used to switch between branches that means you can switch from one branch to another branch by using this command.
You can see in below image master is( right side and down) showing in green color that means you are in master branch.
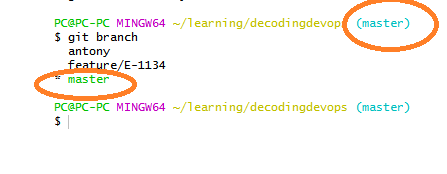
so switch to feature branch by using checkout command
git checkout feature/E-1134
now check with git branch command
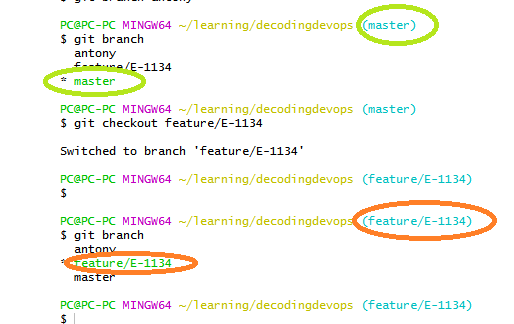
You can in above image feature/E-1134 is in green color and also you can see in right-side in the place of master we have feature/E-1134. That means you are feature/E-1134 branch.
Push Feature Branch Into Remote GitHub or Bit bucket-How To Create Feature Branch
Now you are in feature branch name called feature/E-1134.so now push your feature branch by using below command
git push --set-upstream origin feature/E-1134
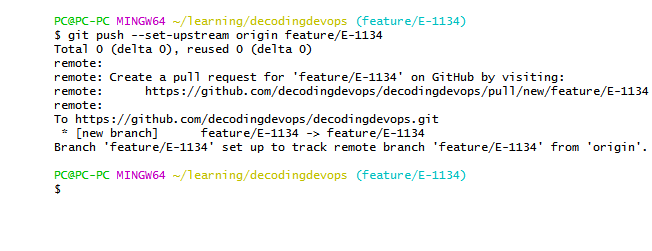 You can see in above image I pushed my feature branch into remote git hub. so we pushed feature branch called feature/E-1134 into remote git-hub repository. now I will push another branch “antony”.
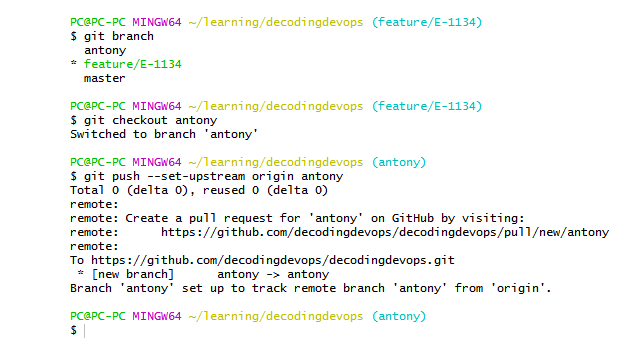 So we have already know that to push any branch into remote git-hub or bit-bucket we must be in that branch only so now I will switch to antony branch.
git checkout antony
Now I switched to antony branch now I will push feature branch “antony” into remote git hub or bit-bucket by using below command.
git push --set-upstream origin antony
So now we have successfully created feature branches in GitHub or bit-bucket.
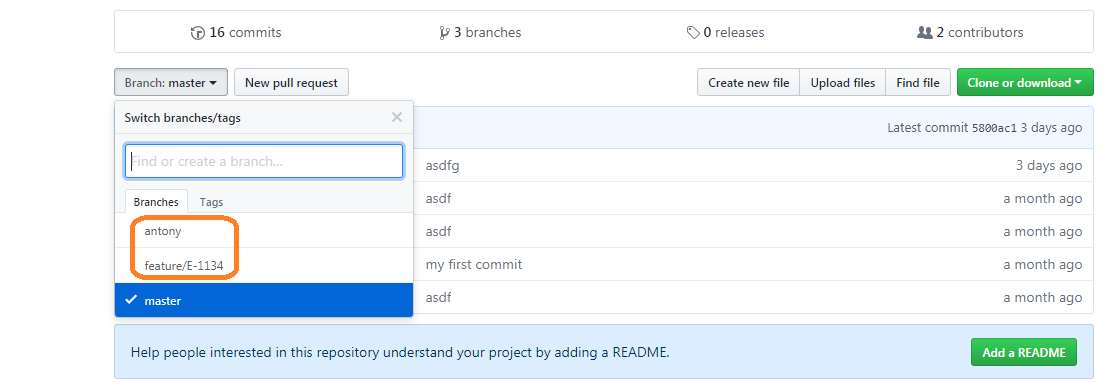
Now you can go to GitHub or bit-bucket you can check there your newly created feature branches.
Note: This procedure (creating feature branches) is same for bit-bucket and GitHub and there is no any difference between “antony” and “feature/E-1134”. by using feature word in branch name we can easily find our feature branch in git-hub or bit-bucket.
Since if you are working any real time projects there may be you have lot branches and you will get lot tasks with task id. so create your branch name as feature/task id. and push to remote bit bucket or git hub.
- how to create feature branch
- how to create feature branch in git
- how to create feature branch in bitbucket
- feature branch in git
- git feature branch
- create feature branch git